Building a QR Code Check In System in Salesforce
A recent non-profit project called for the creation of a QR code check-in system to streamline how the organization identifies clients as they arrive by vehicle. With this system, volunteers can quickly check in food drive recipients by scanning a QR code linked to their information.
When volunteers select the “Search by QR Code” link, a barcode scanner opens the device’s native camera, enabling a fast and contactless check-in process.
This post will explain how to build a backend to support QR code check-ins and enable the automatic application of specific attributes defined for a particular program. For this project, the system automatically recorded the pounds of food donated during the event.
Donation Events
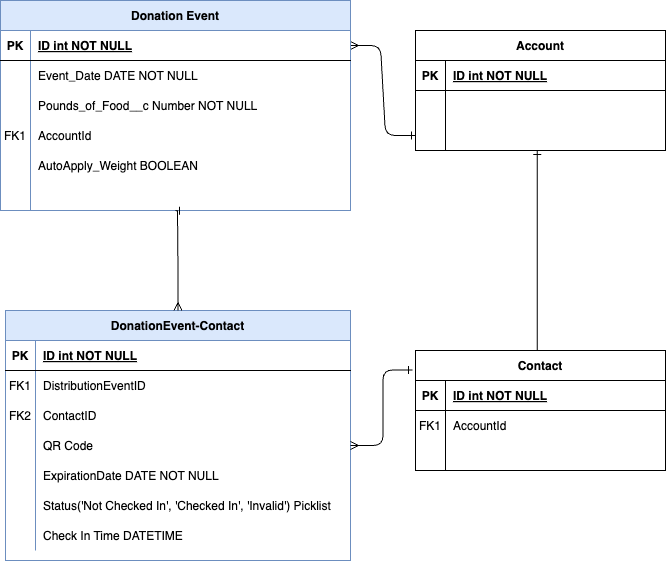
To meet these requirements, a new set of custom objects is needed to support food or clothing drives for non-profit organizations. The setup follows this scenario: each donation program designates a specific location for the drive, which will occur over the course of a single day. Tracking capabilities are required to identify which contacts have checked in with a QR code at each event. Additionally, monitoring each QR code’s status is essential to prevent multiple check-ins by the same contact, along with a mechanism to expire URLs within a certain date.
At the event, the recipient presents their QR code, which is linked to a junction record connecting their contact record and the specific donation event within Salesforce. The diagram is modeled below.

Users of the system
In addition to the Salesforce System Administrator, two other user roles will interact with this system.
The onsite volunteer will use a mobile device to check in donation drive beneficiaries. They will need access to the “Check In” button on the Experience Cloud Site.
The intake specialist will have access to create delivery event records associated with specific account records. This capability is provided via a Quick Action, which they can select on any Account record. Implementation details for a Lightning Web Component action are linked here.
Using the native camera
To enable the QR code functionality on mobile devices, the Community page required custom JavaScript to open the camera. This script is executed when the “Scan QR Code” button is pressed.
The JavaScript prompts the user for camera access, which can be granted permanently by allowing the browser to use the camera. Once access is given, the native camera opens and directs the user to the correct page. A future post will demonstrate how this custom JavaScript integrates with a Visualforce page.
Conclusion
These features streamline information collection for both back-office intake specialists and volunteers. Additionally, the reports generated from these distribution events enable managers to track attendance by showing the number of people registered, checked in, and present at each event. The system also supports automatic assignment of food weight to each contact.The addition of these features reduces the time required to collect information for both the backoffice intake specialists and volunteers. Further, the reports that can be generated from these distribution events will allow managers to understand how many people showed up at each distribution event. How many people were registered, checked in through the check in process. It also allows for automatic food weight assignment to each contact.
In upcoming posts, we’ll explore the technical implementation details behind this system, including how to build the necessary LWC components, create custom objects, and integrate JavaScript with Salesforce for a seamless QR code experience.


